making shiny images in HTML
nobody asked for this, but i thought it would be fun to show how i make those little shiny images on my site cause i think they're pretty neat
this involves having your image be a div, the background of the div being the picture you wish to present. this can also add a lot of flexibility since you can basically "crop" your image by messing with the background-position ^_^
this would look a little questionable on large images (especially on mobile) so i'd advise using this for smaller items
HTML
you will need to establish your HTML. make a div tag with a unique ID or a class name so your CSS will know where to go. for this tutorial, i will be using classes
<div class="skeuoimg"></div>
don't worry if you're using multiple images with this method, you can add a unique ID to make all your glossy divs have their own pictures, like this! ^o^
<div class="skeuoimg" id="artwork"></div>
CSS
this is the actual meat & potatoes of your coding. once you've targeted your skeuoimg div in CSS, you can start styling it however you feel. this is how i have it presented in my css
.skeuoimg {
    border-radius:10px;
    background-color:grey;
    box-shadow:0 0 5px inset black, 2px 2px 5px black;
    padding:7px;
    width:140px;
    max-width:100%;
    height:140px;
}
of course, the height and width is not set in stone! you may edit it as much as you want to have it fit your entire image
the box-shadow adds more to the illusion of a 3d object. the background-color is also optional, but it looks a little better with transparent images in my opinion. the border-radius is of course also optional, but it adds to the sleekness of it all, so i kept it in ^_^
your padding is also extremely important, as this will establish how your "glossy" overlay will be presented later on, since your gloss is essentially an element inside another element. the bigger the padding, the rounder your image will look (though not actually, since it's all just an illusion)
now we can start styling our image to make it look shiny, we'll use the css ::after pseudo-element, along with linear-gradients
.skeuoimg::before {
    background:linear-gradient(to bottom, rgba(255, 255, 255, 0.214), transparent 60%);
    height:100%;
    width:100%;
    content:"";
    border-radius:10px;
    float:left;
}
your border-radius should also match the one of the main class for the best results. float:left ensures that the overlay will not interact with the main element
of course, you can also mess with the RGBA to make the shine stand out more, i like to use rgbacolorpicker.com
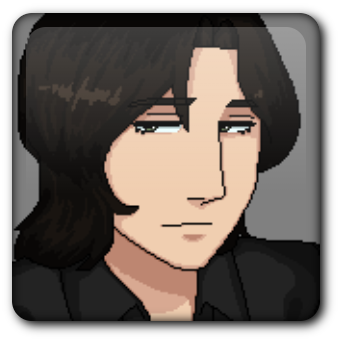
now we'll figure out how to add our picture. i've added my artwork ID alongside my skeuoimg class, so i'll have to target artwork with background-image:url() to add my picture
#artwork {
    background-image:url(https://file.garden/ZcHr2DRVyFfOaOPX/drawings/trevicon.png);
    background-size:cover;
    background-position:center;
}
& that's it! we're done! ^o^
accessibility
accessibity is an important aspect of web design, even if you plan to make it all about aesthetics. we'll want to make sure our cute elements can also be enjoyed by anyone, so we'll have to take precautions to make sure that can happen1
if your image is not purely decorative and provides some constructive information for your users, like artwork or a focusable element, we can take the steps below to make sure it's consumed correctly
our skeuoimg div at the end of the day, is just an img all dolled up. to make sure screen readers like VoiceOver can read them out loud like they're actual imgs, we'll need to add role="img" to the parent element
<div class="skeuoimg" id="artwork" role="img"></div>
of course we'll need some alt text, but we cannot add an alt to a div. this is where the handy aria-label comes in, this essentially acts as the alt for non-images
<div class="skeuoimg" id="artwork" role="img" aria-label="a pixel headshot illustration of one of my original characters, Trevor"></div>
again, you should only do this if it's a constructive image! treat this like alt text, if it's not important, keep it empty (or in this case, just don't use it)
final thoughts
i'd just like to remind you guys that nobody asked for this
i think this is kind of pointless to the average viewer, but if you're like me and you're all about looks it'll probably give you some good stuff to nibble on. cheers!